Labels

Categories: Food | Travel | Beer | Wine | Boston | Humor | TV | Tech | Pop Culture | Politics | Golf | Video | Photo | Auto
Sponsored: Samsung | Cadillac | Volt | GMC | AT&T | Gear List: Cameras, Lights, Microphones, etc.
More: SteveGarfield.com | Steve Garfield's Video Blog (archived 6/19/2013)
“As an Amazon Associate I earn from qualifying purchases.” | Mastodon
Showing posts with label how to. Show all posts

Saturday, December 28, 2024

How to Replace the InSinkErator F-1000 Instant Hot Water Dispenser Filter.

How to Replace the InSinkErator F-1000 Instant Hot Water Dispenser Filter.

https://youtube.com/watch?v=1YStjTHEpvQ&si=4ibtXQqa6QZ31wL3

The instructions that come with the filter are wrong.


Step one, slowly turn the cartridge CLOCKWISE until it stops, to remove it.

Step two, insert the new cartridge and turn it COUNTER-CLOCKWISE until it stops.

Monday, April 29, 2019

Subscribing to a Podcast in the Stitcher Web App

My friend Andrea Syrtash has a new podcast, Pregnantish, and asked me to subscribe. One of the subscription options is Stitcher.

I've never subscribed to a show on Stitcher, so I had to figure it out. Rather than download the app, I decided to subscribe using the Stitcher Web App.

Here's how.

Click the "+" button on Stitcher.

EXTENDED EXPLANATION

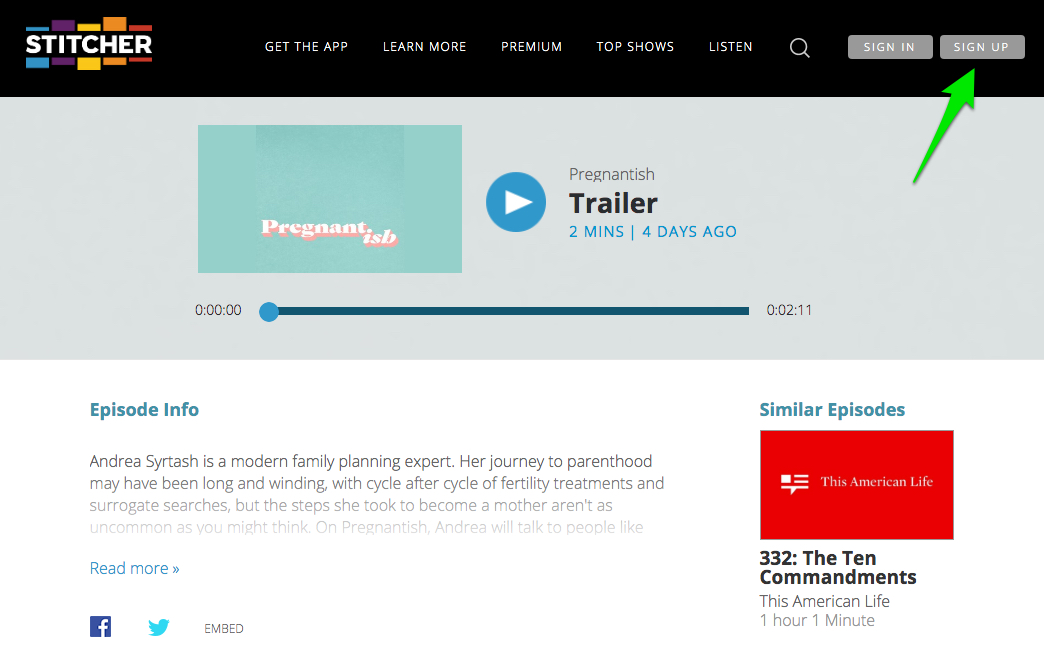
1. Go to the show page for Pregnantish on Stitcher.

2. If you don't have a stitcher account, CLICK SIGN UP, otherwise CLICK SIGN IN and go to STEP 4.


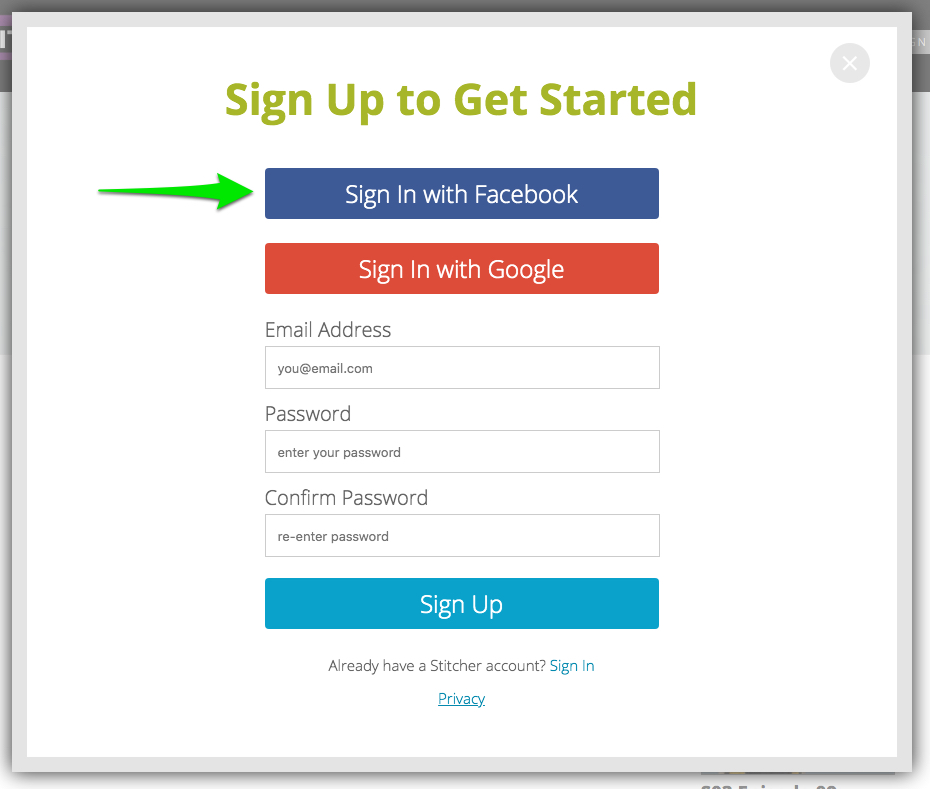
3. Choose how to SIGN UP. I chose Facebook. CLICK SIGN IN WITH FACEBOOK.


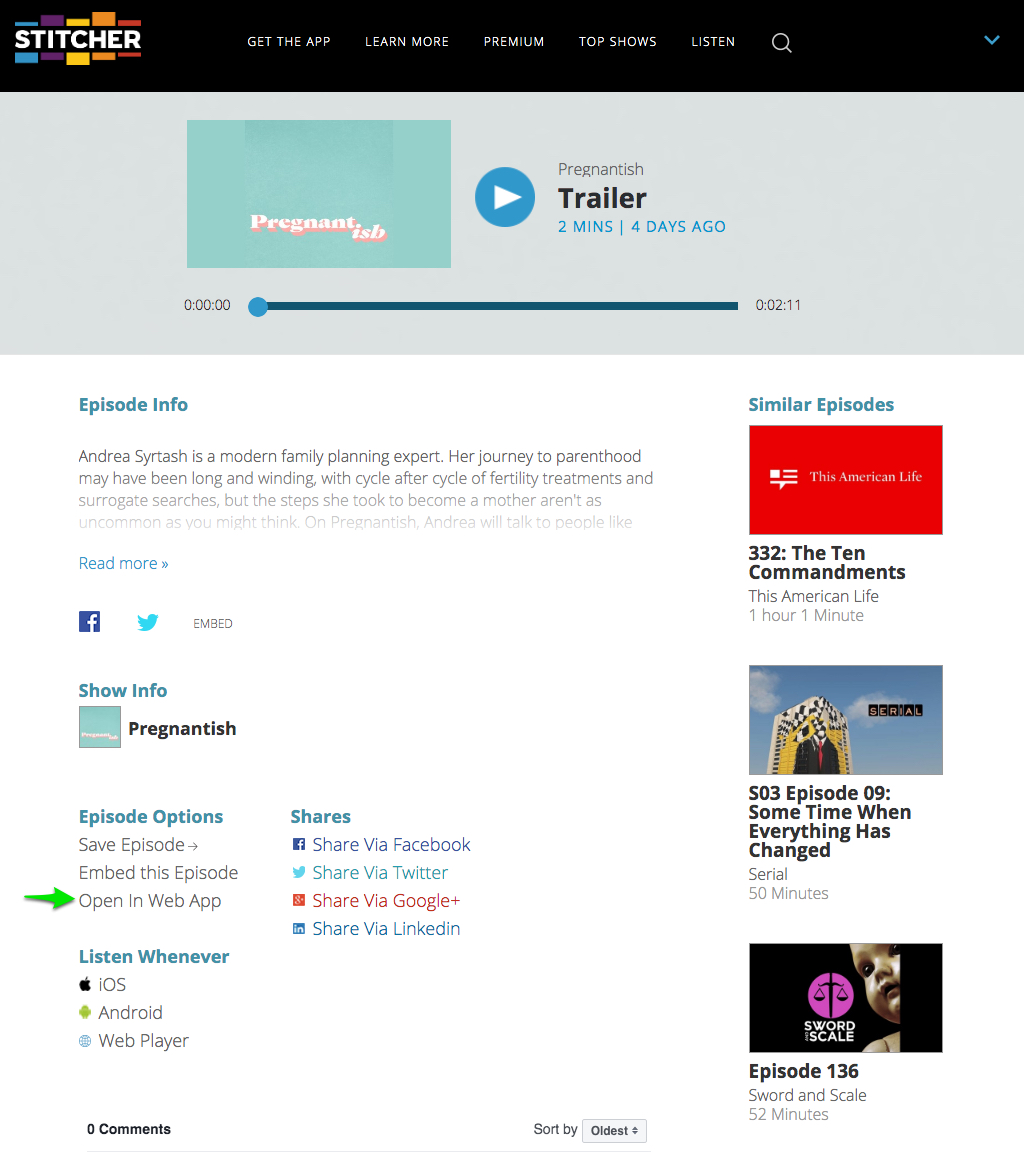
4. Choose OPEN IN WEB APP.


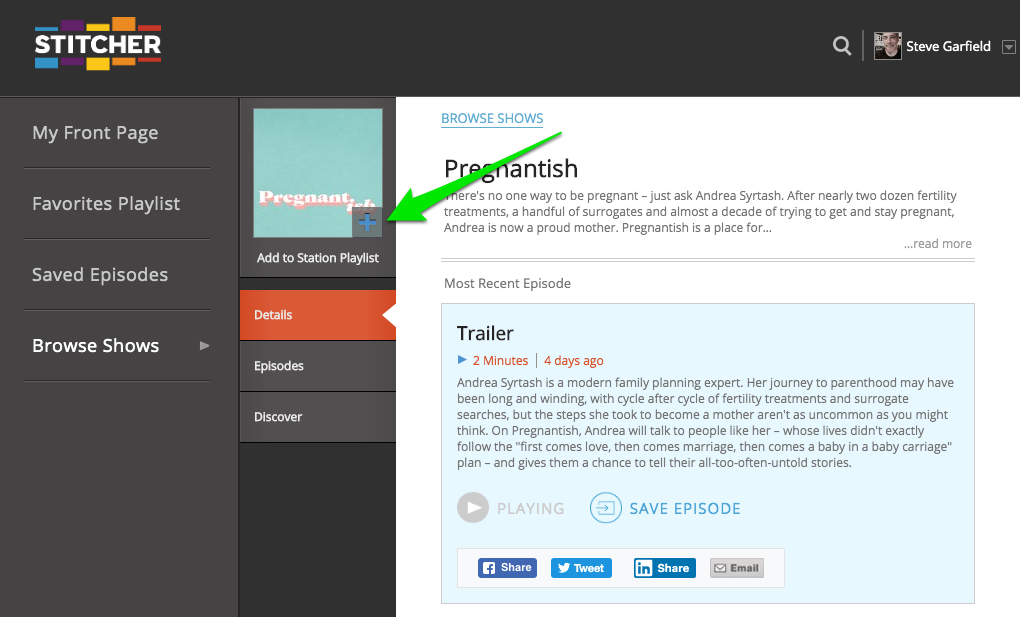
5. CLICK the "+" button to SUBSCRIBE.


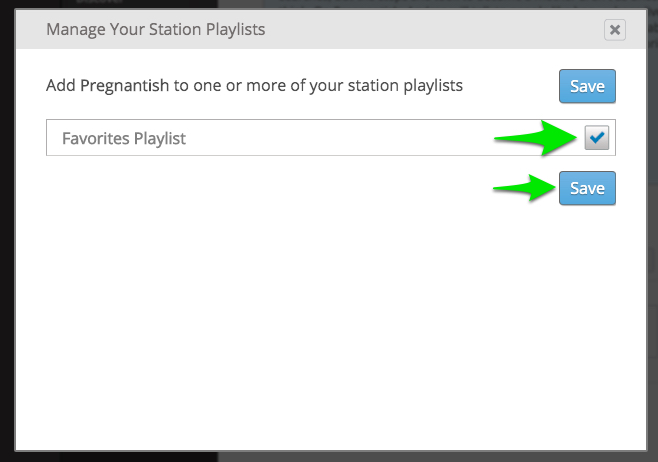
6. CHOOSE THE PLAYLIST, and CLICK SAVE.


That's it. You've subscriber to a podcast with the Stitcher Web App.

Wednesday, November 07, 2018

Create and Order a 2019 Calendar in Apple Photos App with the Mimeo Photos Project Extension

Now that Apple has removed the ability to create and print calendars from it's Photos App, you can now Create and Order a 2019 Calendar in Apple Photos App with the Mimeo Photos Project Extension.

Mimeo was the company that Apple used to print calendars within the Photos App, so not much has changed.

INSTALL
Install the extension to the Photos app via the link above, then use it to create a new calendar.

DRAG
You have to have your photos on the Photos app, then drag them in to your Calendar project.


OPEN AND CREATE
Open the new calendar project and create your calendar months with one or more photos per month. If your photo gets a red exclamation point, that's the app telling your that the photo doesn't have a high enough resolution to print. In that case, you can choose another photo, or reduce it's size on the page, or choose more than one photo on the page, thereby reducing it's size.


ADD EVENTS
In this step, you need to add events like birthdays and anniversaries by hand, one at a time. IN the old app, it imported your events from your Apple Calendar. Not anymore. It would be nice if you could easily add them all in the events sidebar, but you are required to open each month, double click on the day, then add your even in a pop up box. This needs to be streamlined.

ORDER
Click the button to order a calendar for $19.99. Once in the order entry screen you add shipping details and then you can increase your quantity if you want.

I'm excited to continue to have this calendar creation feature available from Apple. Last year I tried a few other options the the size was too small, and the paper quality wasn't as good. One thing to note, I received immediate answers to my questions via messaging with Mimeo Photos product support.

HAPPY 2019!

Saturday, June 30, 2018

How To: Printing My Mom's Blog as a Book Using Blog2Print and Amazon Createspace

My mom, Millie Garfield is one of the internet's oldest bloggers. Her blog is My Mom's Blog.

She's been blogging since 2003. I printed an earlier collection of her blog posts from Oct 2003 to June 2008 using Blurb.


My Mom's Blog on blurb.
Size Small Square, 7×7 in, 18×18 cm
404 Pages
Publish Date Jul 10, 2008

This time I used blog2print to print the rest of her posts from July 2008 to Sept 2017.

It was was easy enough to get started by choosing the blogging platform, and entering in the URL of her blog.


Next you choose the range of blog posts you want to include in the book, and choose your formatting.


Then all you do to create the book is click on the button, CREATE MY BOOK.

Once the book is generated you can choose to purchase a printed version, or a PDF. In this case, I went with PDF because I wanted to submit my book to Amazon Createspace, where I can sell it online.

Here is the pricing:


Here’s the basic pricing structure:
A soft cover book with full color pages is $19.95 for 20 pages (additional pages are $0.32 each)
A standard laminate hard cover book with full color pages is $34.95 for 20 pages (additional pages are $0.32 each)
A deluxe hard cover book including dust jacket with full color pages is $37.95 for 20 pages (additional pages are $0.32 each)
A digital PDF download is $8.95
Here's a snapshot of a page as printed to PDF by blog2print.


This is really great. Perfect for printing. Except for the fact that, in this case, my mom's book was going to be 466 pages, and at that size, the page numbers were going to be cut off by the binding. After submitting this PDF to Amazon createspace I got an error notifying me of this.


So at this point I had to call in my book publishing friend, J. Bruce Jones, Bruce the Book Guy, who's business it is to help people self-publish.

He suggested that I reduce the size of my book from 8 1/2 X 11 to 8 X 10, thereby cutting off the footing where the offending page numbers existed. That worked.

Note: I contacted blog2print to see if they could regenerate my book without the footer nad page numbers, but they told me that it was hard coded and that there was no way to do it.

After submitting this revised PDF to Amazon createspace, along with a cover that I designed using their cover creator, I had my book approved for printing a proof.

You can get a virtual proof before ordering a hard copy.

Here's what the virtual proof looks like.


It all worked out with no footer. I also got an image that some of my images were not 300 dpi, but they are good enough at their resolution. In my last book I worried about createspace flagging image resolution, but learned to ignore those warnings. If after getting the printed proof, some images didn't look right, at that point I could swap them out.

I ordered a hard copy proof, and here's how it came out.

Cover:


Inside:

Wednesday, March 05, 2008

You need a tiny screwdriver


Just upgraded my MacBook Pro from 2GB to 4GB.

You need a tiny screwdriver to access the memory. [ a Phillips size 00 screwdriver (eye-glass Phillips screwdriver) ]

MacBook Pro: How to install memory

YouTube video: MacBook Pro RAM Upgrade

Monday, July 09, 2007

How To: Set Up A New Macintosh

Here are the settings and programs I set up when putting together a new Macintosh.

1. Disable Caps Lock
System Preferences, Keyboard, Modifier Keys. Set Caps Lock Key to No Action.

I just hate it when I'm in the middle of typing somETHING AND ALL THE WORDS ARE IN CAPS, oops, because you hiy CAPS LOCK by mistake. Ha ha. Why is there a CAPS LOCK key any way? I can't think of one reason to use it. So I don't.

2. Dock
Apple Menu, Dock, Dock Preferences
Dock Size - Smaller
Automatically hide nad show the dock

3. Safari
Safari Menu, Preferences
Appearance - Standard Font - Verdana 18
Tabs - Enable Tabbed Browsing

View Menu
Show Status Bar

4. iChat
Add AIM username/password

5. flickr
Downlod and install Flickr Uploader.
There are others, but I'm used to this one. Just drag and drop from iPhoto and upload. Easy.

6. Text Wrangler
Text editor


7. ImageWell
Image editing application that lets you quickly resize, crop, watermark, edit your images, take screenshots and then upload them to the web, save to your computer or email them to a friend. The cool thinkg I like about ImageWell is that you can grab and image and then upload it to y our host. ImageWell then can save the HTML code that points to this image to your clipboard so you can go to your blogging software and paste the code right in.

8. Final Cut Studio
This takes about three hours to install. You can now choose alternate locations for all the image and data files prior to installation. That's cool.

9. SnapZPro X
Handy to capture video and save to disk.

10. Adobe Photoshop

11. Microsoft Word/Excel
If you don't already own these you can try Google Docs and Google Spreadsheet.

12. VueScan
HP scanner software support.

13. TypeIt4Me
Corrects common typing mistakes.

14. RBrowser
Free FTP client

15. Windows Media Players
Windows Media Player 9 for Mac OS X
Windows Media® Components for QuickTime, by Flip4Mac™.
Microsoft stopped supporting the Mac at version 9 and hte current PC version is 11. D'oh!

16. StuffIt Expander 11.0.2
To open downloaded and compressed application, Like Windows Media Player 9, above. D'oh!

17. RealPlayer

18. Skype

[ To Be Continued ]

Add your suggestions in the comments...